Vista JavaScript Menu provides huge collection of 1400 web buttons, 6600 icons, 300 ready-made samples, so you'll create really nice looking menus and buttons with little or nodesign skills at all! Web 2.0, Mac, iPhone, Aqua buttons, Vista, XP, transparent, round, glossy, metallic, 3d, tab menus, drop down menus will be a breeze!
Double click on the one of the predefined buttons' and submenus templates to apply it to your menu When the submenu is larger than the visible area of the page the submenu will be automatically decreased. You can use scrollbar to see all submenu items Build menus completely based on Cascading Style Sheets. It is possible to appoint the individual CSS styles for separate elements of the menu.
Features
Overlap all Html Elements on the Page Submenus drop down over all the objects of the page (select, flash, object, embed).
purchase web buttons menu toolbars Search Engine Friendly Vista JavaScript Menu generates html code which is transparent to search spiders.
dropdown scrolling javascript menu Export graphic picture Using Vista JavaScript Menu you can save menu graphic picture as gif-files (*.gif).
different concept menus using css Html Tree Menu Tutorial Great Looking Web Navigation with Minimum Effort Vista JavaScript Menu provides 500+ web buttons, 100 submenu designs, 6600+ icons, 50 ready-made samples, so you'll create really nice looking website html menus and html buttons with little or no design skills at all! Vista, XP, Win98, Mac, Aqua buttons, round, glossy, metallic, 3d styles, tab menus, drop down menus will be a breeze!
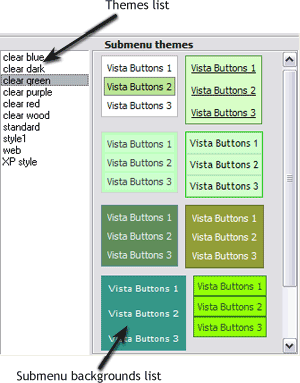
Ready to use button templates and submenus themes. In the Themes toolbox you can choose selected buttons and submenu themes for web appearance.
Multilanguage User Interface (MUI) Since the version 2.79 Vista JavaScript Menu supports the multilanguage user interface. Vista JavaScript Menu is translated into the numerous of languages such as: German, Dutch, French, Italian, Spanish, Portugues, Arabic, Polisch, Romanian, Hungarian, Bahasa Malaysia.
In the Themes toolbox you can choose submenu themes for web appearance. Click theme name to open it. The theme's available submenu's backgrounds will appear in the Submenu backgrounds list.
You can check how a background responds to the mouse events without applying it. To do so just move mouse over/click the background.
To apply chosen background, just double-click it. Submenu appearance will change.


 (please include template name in the message title)