Vista JavaScript Menu provides huge collection of 1400 web buttons, 6600 icons, 300 ready-made samples, so you'll create really nice looking menus and buttons with little or nodesign skills at all! Web 2.0, Mac, iPhone, Aqua buttons, Vista, XP, transparent, round, glossy, metallic, 3d, tab menus, drop down menus will be a breeze!
Apply any font of any color, size and font decoration you need. Use any available type, color and thickness of a menu's frame. Choose any color for submenus and items backgrounds. Specify various values for spacing and padding for the whole menu and for each separate submenu. Create separators using your own pictures, size and alignment.
Features
Insert button script into the existing HTML page You can insert your button script into the existing HTML page. To do so, click "Page insert" button on the Toolbar.
style single selection menu Save project. Save your image buttons as html You can save current project in the project file (*.xwb) or into the HTML file (*.html).
design a flyout menu with javascript Ready to use button templates and submenus themes. In the Themes toolbox you can choose selected buttons and submenu themes for web appearance.
menues con submenues en css Menu Layers High Quality and Professional Results You don't have to know HTML, JavaScript, CSS or any other coding languages to make multi-state rollover web buttons, professional cross-browser, search engine friendly DHTML menus. All you have to do is make some clicks and adjust buttons as you wish for them to appear. Vista Web Buttons will generate all necessary images, html, javascripts, css styles automatically!
Button State You can create 1-state, 2-state, 3-state and 3-state toggle buttons using Vista JavaScript Menu. 1-state buttons are simple static image buttons. 2-state buttons respond to mouseOver event creating rollover effect. Mouse click doesn't change the button appearance. 3-state buttons support both mouseOver and mouseClick event. 3-state toggle buttons additionally stick in the pressed state after a click.
Create your own button themes Theme editor helps you create your own themes or modify existing ones.
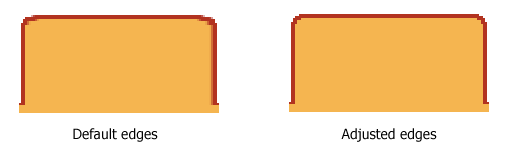
Press "Edit Properties..." button to edit button edges width. By default, when you add new button, its edges widths are set to 5. But if you will change preview button size to 100x50 or bigger, you will see that some image elements look "fuzzy" (left image on the picture below). It happened because the play buttons border is not within the edge area.
Set both horizontal and vertical edges width to 10. You can see that the result looks much more precise now. Border is not resized because it is within the edge area now (right image on the picture above).
Click "Save theme" button to save theme changes. Click "Close" button.
Technique - How2 Make a Stillframe DVD Menu Make a Stillframe DVD Menu. Stillframe Menus are either built from a The layers selected in this property will display in the Menu picture all the time.
Photo Jumble Help pages Main Screen Menu. Menu File. Menu Edit. MenuLayers. Menu Pictures. Menu View. Menu Help. Main How to add one layer? How to rotate layer? How to place background
Managing LayersLayers can be manipulated by using the Layers dialog, through commands in the Layersmenu, The Status Bar includes a pull-down menu to select the current Layer.
Paint.NET Help - LayersMenuLayersMenu. The commands in this menu only affect the currently active Layer, as chosen in the Layers Window. All properties of the layer, along with the graphical (pixel)
Menu Mode MenuLayers. The layering system can be used to create smooth animations using "onion If at least one layer uses delta frame position (onion skinning) then the
Orton Effect Tutorial: Action Details Make a new exposure adjustment layer (Menu: Layer -> New Adjustment Layer -> Curves ) Name the new layer "Raw Exp 2.0". Set the points: (0,0)
MenuLayer Virtual Google Earth - MenuLayers. Use "Layers" menu in order to display information you are interested in related to the view you look at.
The PHP LayersMenu System PHP LayersMenu is a hierarchical menu system to prepare "on the fly" DHTML menus relying on the PHP scripting engine for the processing of data items.
Layers Palette in AKVIS MultiBrush Using AKVIS MultiBrush: Palettes. The Layers Palette lets you work with layers and groups of layers. Layer options. Blend modes.
LayersmenuLayersmenu. New layer adds a new layer. This opens a dialog with Layer extracts a copy of the current layer. Layer + descendants makes a new document from
Orton Effect Tutorial: Action Details Make a new exposure adjustment layer (Menu: Layer -> New Adjustment Layer -> Curves ) Name the new layer "Raw Exp 2.0". Set the points: (0,0)
Popup MenuLayers - Example 1 The menulayers are set up using div's and menu items are in unordered lists. The menulayers in example two have more menu like hover effects.


 (please include template name in the message title)